Could you get any more Australian?
So why do I call them dangerous? Well, there is a few reasons.
1.If you sit under a bunya pine while it's in season, you may die. The cones are as big as your head (or bigger!) and can weigh upwards of 10kg. Don't try it. I noticed a tree in the Melbourne Botanic Gardens when I was there last that had a makeshift fence around to stop people having their picnics under it.
2.They can explode. Wear eye protection and stand back if you cook them on a bbq.
3.While trying to pry open a shell on a raw one with a hammer I nearly bashed my finger off.
4.While trying to cut open the shell on a soaked one I nearly chopped off a nipple with the handles of my secateurs. I don't know how, all I know is that it hurt like a motherf*cker. I hope I didn't do any lasting damage!
Okay, so bunya nuts are about as much of a pain in the ass to peel as
chestnuts, but not quite. At least these ones stay whole. I looked up all sorts of ways to do it online, but they all sounded hard. One guy said to go outside and hit them with a mallet to crack the shells. I don't have an outside and I don't have a mallet. I could have boiled them whole and then peeled off the shells (with difficulty) afterwards but all my pots and pans were dirty and I couldn't be bothered. I could have roasted them, but I was afraid they'd explode and catch fire because I couldn't split them a little first.
So in the end I decided to soak them overnight in a bowl of cold water, figuring the shells would soften:
And in the morning the shells were indeed soft, so I could hit them a little bit gentler with a hammer than if they were raw-raw:
You can see the cracks in it. A bunya nut has a pointed end and a round end. At the pointed end there are 3 'seams'. Hit the hammer on one of them. The seams will crack and you can peel it.
I decided the hammer freaked me out too much as it was getting too close to my thumbs, so I dug out my secateurs (yes they are rusty and old and under-used and covered in WD-40 and potting mix but did I ever say my kitchen was sanitary?) and decided to just slice off the skins. Use them like a nut cracker first to split the seams (this was way easier than it was with the hammer) and then slice down toward the round end until you can force off the shell.
At this stage the nut can sort of be popped out. You don't have to struggle with pulling off the rest of the skin.
It may come out with a layer of brown stuff on it, like a shelled peanut:
I took it off. Dunno if you have to, I just did.
Now for the cooking. Once you have your desired amount of bunya nuts peeled, give them a bit of a rinse, especially if you used disgusting dirty tools like I did. Mmm WD-40, my favourite!
Then put them into a dry frying pan and cook, as if you were pan roasting cashews to make cashew butter:
Bits will go black and brown and they will smell nice. I had a lid over them for most of it because I didn't have a clean stirring spoon either (I know, I'm a slob) so I could just shake them around. I was also still scared of them exploding in my face (this is unlikely to happen!).
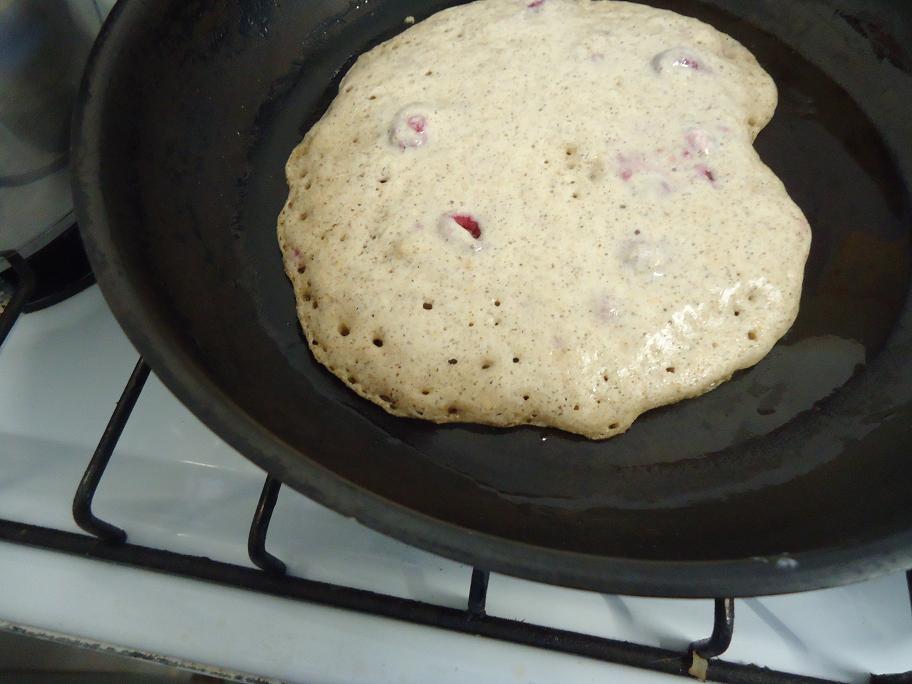
Once they are all browned like in the above picture, put them on a chopping board and use a sharp knife to finely chop like so:
You could just eat them whole too if you like, but this time I decided I wanted to put them in pikelets! Hence the chopping.
I ran a search on google for vegan pikelets as I have never made them before, and found
this recipe on
The Year of the Vegan which sounded perfect as I had some soft tofu in the fridge I needed to use before it turned yellow.
So I made the recipe exactly as it says except I used wholemeal flour, and didn't have any maple syrup so I used 1 tbsp of rice syrup instead. And at the end of all the whisking, I folded in half a cup of the chopped bunya nuts, and cooked as normal.
I spread vegan marg on them, sprinkled a few extra chopped nuts on top and drizzled them with a good amount of rice syrup. Yum.
(It took me so long to make them all they were cold by the time I got to eat them. But that's ok, they taste better cold and I'm pretty sure pikelets are meant to be eaten cold).
So to wrap up this god awful long entry, what do they taste like??
Well, like nuts, I guess. I want to say they taste like pine nuts (hur, hur!) but I'm not sure what they are like. They have also been compared to chestnuts, and I have to say that's probably the closest thing I can think of too. They have a different texture, quite soft (though that's probably because I soaked them) and were a nice addition to the humble pikelet. Now I have to think of what to do with the rest!! I bought a ½ kilo. Stay tuned for Dangerous Nuts Part 2 :)