Wednesday, March 30, 2011

Tom Yum Soup

Not from a jar!

I have a massive lemongrass that I really need to use before it dies back, so I finally learnt how to harvest the stems without killing it. It's very easy, reach in and twist!
Of course I had to find something to cook with it, and the first thing I thought of was a classic Tom Yum Soup. I almost always order this at a Thai restaurant if they have a vege option, and most seem to nowadays.

I went to a different fruit shop than I usually do on the way home from work one day and found a packet of Kaffir Lime Leaves for only $1.50! (You can freeze these to use later). Lemongrass and kaffir lime leaves - two main ingredients of a tom yum.

Tom Yum Soup
Serves 4 as a large starter (or add some noodles for a main)

Ingredients
6 cups chicken style stock
2 stalks lemongrass, minced, and reserve the hard inedible part (here is a handy how to)*
3 kaffir lime leaves
2 hot red chillies (such as birdseye) minced
4 cloves garlic, minced
1x1 inch ginger, sliced into match sticks
1 cup brocolli, chopped
1 carrot, sliced into half moons
1 zucchini, sliced into half moons
2 tomatoes
1 block of tofu, cubed (I used some seitan I had in the freezer)
4 tbsp soy sauce
1 tbsp fresh lime juice
1/2 cup fresh basil

Method

In a large pot, bring stock, minced lemongrass, lemongrass stalks, kaffir lime leaves, chillies, garlic and ginger to a boil. Boil for about 10 minutes then add brocolli, carrot, zucchini, tomatoes and tofu/seitan to the pot. Simmer until vegetables are tender.

Just before you are ready to serve, stir in the soy sauce, lime juice and basil.

Eat!

*I sliced mine up thinly then put it all into my mortar and pestle and ground it up almost into a paste. A food processor would also work. You could do the lemongrass, garlic and chilli all at once if you like.
-----------
This was so good. Restaurant quality! I reckon I probably won't buy the jarred paste again :) We had it with a side of rice noodles and peanut butter.

One day if I'm rich I might buy a packet of those weird vegan prawns you can get at Asian food stores. I saw some once and they were like $15!! (I've had vegan calamari before at a restaurant - amazing. And I know calamari.)

Apparently lemongrass is freezeable. So I think I'm going to harvest most of what I have (about a million stalks) and divide the rest and replant it for next summer. I'll either freeze them as whole stalks or process the whole lot and freeze in tablespoon sized amounts like I usually do with tomato paste :)

Tuesday, March 29, 2011

Fruit of the Month - Avocado!

Just in time for the end of March (already? dude) - the humble avocado!
I love love love avocado. Unfortunately they are generally expensive, but ocassionally you get quite good specials. These were $1.99 at my local fruit shop, but I've been buying them lately for up to $3.

Avocadoes are soft, creamy and very tasty. (To me. My dad reckons they taste of soap.) You can eat them as is, spread on toast, as guacamole, on pizza, on top of tacos, anything!

I've been trying to eat more fats like avocado to try and help the skin on my hands get better (may be too much info, but I have contact dermatitis all over my hands that will not go away. I've tried almost everything, except food, funnily enough!) This link has some nutritional info. Of course it is an official avocado website so it may be biased on the avocado's wonderfulness but I pretty much agree.
Some cherry tomatoes to add some colour would be awesome.
Tonight we made this 15 minute Creamy Avocado Pasta from Oh She Glows. It's literally just avocado, lemon juice, pepper and garlic. Yum. And it was so good. A very easy way to incorporate more avocado into my diet. I hope it makes a difference, alongside everything else I'm doing.

(The pasta dish cost 80c per serve for me to make, by the way).

Monday, March 28, 2011

I love council pickup

Look at what I found!

I can't believe it I am so excited!

In Brisbane once a year the council does this 'council pickup' thing where people can put any of their old crap on the street (from fridges to old beds to mattresses to cardboard boxes) and the council will come and pick it up and dispose of it. This year they are encouraging the public to go round and get stuff they think they can recycle which is brilliant. (Apparently in past years we weren't supposed to...oops. Last year I found a Wedgwood teapot in perfect condition).
I collect teapots and tea sets.

ANYWAY! The bike! I bought a mauve coloured vintage traveller bike a while ago on eBay for a fair chunk of change. I love it. It's worth every penny. I've been wanting to get Nadine a bike too so we can go on some of the nice bikeways Brisbane has to offer (riding by myself is a bit boring, unless I'm going somewhere specific). But we've been so broke lately so it just wasn't an option for a while!

And today after work I went for a quick walk and saw this beauty (the maroon one).

It's in tip top condition, brakes work, gears look fine, it needs new inner tubes and tires. But the paint isn't even scratched, there is no rust that I could find in my quick inspection, the seat is untainted AND it's the perfect size for Nadine!

And it was free!

This totally made my week. Thank you people who can't be bothered selling such a gem for lots of money.

Sunday, March 27, 2011

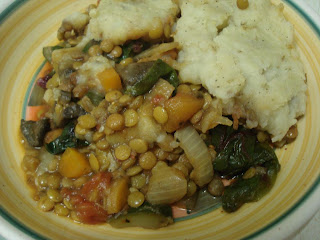
Gardener's Pie

I really felt like lentils because I haven't had them for ages. I've been using up my millions of packets of split peas first. (I've only got 1kg left! haha. I couldn't walk past 500g packs of split peas for 50c without buying at least 10 of them). I thought about using the split peas in this meal but decided it wouldn't quite work for me.

Gardener's Pie
Serves 6

Ingredients
250g green/brown lentils
2 carrots, diced
1 large zucchini, diced
100g mushrooms, thickly sliced
1 onion finely chopped
4 cloves garlic finely chopped
1 tbsp mixed Italian herbs
400g can chopped tomatoes*
750ml chicken style stock
The greens from one bunch of beetroot, well washed and roughly chopped**

1kg potatoes, washed and cooked and made into mash. We make ours with a little soy milk, nutritional yeast, margarine and pepper.
Pretty pretty

Method

Prepare mashed potatoes. Set aside.

In a large stock pot, saute the onion and garlic until it begins to soften. You can do this in oil or water - I used coconut oil. Add the carrots, lentils, stock, herbs and can tomatoes. Bring to a boil then turn down to a simmer and cook until lentils are soft/edible. It may run out of water, so keep an eye on it. Just add more, 1/2 cup at a time if this happens.

Stir in the mushrooms, zucchini and beetroot greens. Cook until mushrooms have softened and greens have wilted.

Pour into a casserole/lasagne dish and spread potatoes on top. Sprinkle with herbs, nutritional yeast or pepper if desired.

Turn oven to 180 degrees Celcius and bake for 1/2 an hour or until potatoes are crispy on the top!
----------
*ALDI sells cans of organic chopped tomatoes for $1.29! Or non-organic ones for 69c (at the moment). I was pretty excited, I bought 3 cans.
** Spinach, silverbeet, kale or any other kind of leafy green can be substituted for this. Even frozen spinach (just add to the pot earlier, or defrost first). I just had beetroot greens on hand. Speaking of beetroot I should really use those before they go soft.
          
This is an excellent meal to cook up when broke or in need of something hearty, filling and comforting, and you can't be bothered cooking rice. It reheats well and could be frozen to have another time. You could use whatever veges you have on hand - I had mushrooms to use up but I probably wouldn't go buy them specifically for this, for example. Celery would be a good addition. Frtozen peas or beans would be too :) It ended up costing me about $1.50 per serve.

Saturday, March 26, 2011

Crumpets!

I made crumpets from scratch today for our breakfast! I love Saturdays.

I used this recipe, shared by Mangocheeks at Allotment2Kitchen.

I made some substitutions,, as per always! I used homemade hazelnut milk in place of dairy and wholemeal plain flour in place of white. It took a few goes before I got the hang of making them. The first few I put too much batter in the egg-ring so it turned out doughy and not bubbly, but they started to work well after I realised that! My egg rings are quite small so I could make many more than 12.
I love the little holes. I cooked them up last night, put them in the fridge, and stuck them under the grill this morning to heat through.
Yuuummm. On ours we had lots of nuttelex margarine, jam, and a fruit syrup in place of honey. I ususally buy rice syrup but the shop ran out so I got this instead. It doesn't taste nearly as much like real honey as the rice syrup does, but it does the job. I also think a cream cheese (Tofutti or something similar) would be delicious! I'm going to make some more sometime soon and freeze them.

Wednesday, March 23, 2011

Spiced Bean and Bulgur burgers with Silverbeet Stem Chips


Do you love my trashy stubbie holder as much as I do? Hahahaha
I made these the other night partly as a way to use up a heap of crap I have had lying around in my 'pantry' (I don't have an actual pantry so space is valuable) for too long, and partly because I haven't had a good vege burger for absolutely ages. The silverbeet on the side is a variation of a recipe I found in the Silverbeet chapter in the Kitchen Garden Companion (such an inspiring book!). It is truly an excellent way to use up those stems that always get left behind in the fridge to go soft! You CAN eat them, and they taste like the leaves, only subtler.

Anyway, to the recipe:

Spiced Bean and Bulgur burgers with Silverbeet Stem Chips
Makes 8 burger patties

Ingredients
For the Burgers -
2 1/2 cups cooked beans (I used a mix of white beans and black eye peas)
1/2 cup raw cashew nuts
1/2 cup bulgur/cracked wheat, soaked in 1 cup of boiling water until soft. Drain any excess.
1/2 cup mashed sweet potato
2 tbsp nutritional yeast
1 tsp garam masala
2 tbsp soy sauce
2 large garlic cloves, crushed
1/2 tsp curry powder, chilli powder, and ground coriander seed
1/2 cup whole meal flour
black pepper

For the silverbeet chips -
Enough silverbeet stems to serve who you are feeding (I used the stems of 1 bunch for two of us)
A few tbsp chickpea flour
Dried herb of choice
Juice of half a lemon
Oil for shallow frying

Method

In a food processor, combine the beans, cashew nuts and sweet potato. Blend until smooth (or if you like chunks, leave some chunks). Transfer to a large bowl and stir in the rest of the ingredients until well combined.

Shape into 8 flat patties and put in the fridge to firm up.

Meanwhile, slice the silverbeet stems into sticks. Bring a pot of water and the lemon juice to a boil. Boil the stems for 5 - 10 minutes. Drain and run under cold water to stop cooking and dry with a paper towel.

Put the dried stems in a bowl and toss with the chickpea flour and dried herbs.

Heat some oil in a frying pan and fry the stems in batches until crispy. Place on a paper towel lined plate in a warm oven.

You can either fry or grill these burger patties. They are good either way :) I fried mine in the oil left over from the chips, until brown on both sides. For lunch the next day I grilled them for 10 minutes on one side, 5 minutes on the other.

Serve on bread rolls with salad and sauce of choice :) tahini-mustard-sweet chilli sauce was pretty good :)

I made my bread rolls myself - I used the exact same recipe as the bread I make, but divided it after it's first rising into 6 balls before rising again. I think I cooked them for 25 minutes at 200 degrees, but check them after 15 just in case. They were pretty damn good!
---
All these ingredients I found lying around my kitchen. The potato was in the freezer begging to be used, I always have beans in the freezer, cashew nuts and bulgur were the last of their packets...Any nut could be used instead of cashews, cous cous, quinoa, buckwheat or rice would be a good replacement for the bulgur wheat. (I have had the bulgur in a jar for over...2 years now. Shame! I can't remember why I had it in the first place.)

I am definately cooking my silverbeet stems this way again next time I have them. I usually just chuck them into a curry or stir fry, but this way of cooking  them preserves their flavour a bit more.

Sunday, March 20, 2011

Creamy pasta sauce

Yesterday my sister was talking about how she was going to make carbonara for dinner that night. It made me really want carbonara for dinner. My thought pattern went straight to an alfredo sauce recipe I have made before, and I would just add some thinly sliced seitan (I use the Vegan on the Cheap recipe) into it to sub for the bacon, or pancetta or whatever it is that you use in carbonara. I thought I had everything for the recipe at home, so I didn't go get anything at the shops.

Of course I didn't have everything (I was missing the tofu, duh) so I just threw together this mess:
It actually worked out really well. It was in no way a carbonara (I couldn't even be bothered defrosting my seitan) but it is a creamy proteiny pasta sauce and it satisfied the craving. It's a good way to use up any okara you have leftover from soymilk making, I also chucked in some almond meal/pulp leftover from my almond milk making. It works, trust me. Next time I will use all soy/almond milk, but I had some coconut cream leftover in my fridge that I didn't want to waste.

Pasta with Cream Sauce (inventive, I know)
Serves 3-4

Ingredients
200ml light coconut cream
50ml soy milk (I just topped it up to 1 cup)
3 garlic cloves, crushed or grated
1/2 cup nutritional yeast (1/4 cup provides 400% reccomended daily value of B12 did you know?)
170g okara (what I had leftover from making milk with 100g dry soy beans)
1/4 cup almond pulp
1 cup 'chicken' stock
1 tbsp tahini
black pepper
1 tsp mixed herbs
1 tsp chilli powder
3 tbsp flour*

1 cup frozen green peas
1 cup cooked white beans

375g cooked pasta

Method

Put the first block of ingredients into a food processor and blend until smooth.

Put pasta on to cook, when almost done put mixture from the blender into a medium sauce pan on high heat. Stir until very thick. This won't take long. Stir through your beans and peas.

When pasta is done, drain it and return it to it's pot. Pour in the sauce and toss to combine.

Divide among plates and serve! We got three servings, but they were a little bit too big, so dividing it into four would probably be perfect.

So much of the okara I get from making soy milk gets wasted, which annoys me. I always have one lot in the freezer but never use it so I don't want to just keep freezing it all. However we have been using it lately! Such as in the above recipe, and the other week Nadine made an awesome lasagne and I told her to mix it into the plain tomato sauce. It made it quite meaty and cheesy tasting which we were pleased about. I'll use that trick again.

This ended up costing me $1 per serve (4).

*Next time I'll use only 2 tbsp flour.

Saturday, March 19, 2011

Wholemeal Banana and Raspberry Muffins

I love banana muffins. It's really the only kind of banana I like, but the same old plain banana muffins get boring after a while.

Wholemeal Banana and Raspberry Muffins (cane sugar free, fat free)
Makes 12 regular muffins

Ingredients
2 cups plain wholemeal flour
1 tbsp baking powder
1 tbsp whole flaxseeds, ground mixed with 3 tbsp water
3/4 cup soy milk
1 tsp apple cider vinegar
1 tsp vanilla essence
1/3 cup unsweetened applesauce
1/2 cup mashed ripe banana (2 small)
1 cup frozen unsweetened raspberries

Method

Lightly grease a muffin pan with margarine or oil. These muffins will probabaly stick to paper liners, and my muffin pan isn't non stick, though if yours is in theory you won't need to grease.

Preheat oven to 200 degrees C.

In a small bowl or jug mix together the soy milk and cider vinegar and set aside to curdle.

In a large bowl sift or stir together the flour and baking powder.

In another small bowl mash the banana and stir in the vanilla, flax egg, curdled milk and applesauce.

Gently fold the milk mixture into the flour and stir in the raspberries. Divide evenly among muffin holes and bake for 15-20 minutes, or until a toothpick comes out clean :)

These were just sweet enough for me. We are trying to cut out sugar, but if you want a little extra sweetness in your muffins you could add 1/4 - 1/2 cup of sugar. I have to remind myself that just because they are healthy it doesn't mean I can eat them all at once haha. I have a million frozen bananas so I could just make some more..

I was going to post the rye banana muffins I made but I can't find the recipe I wrote down! So I posted these instead.

Also, I finally figured out how to add a tab across the top of my blog page! So now there is an about me section. I figured people read this now so why not. I'm thinking of adding a recipe page too. One day :)

Thursday, March 17, 2011

Almond milk

I splurged and bought myself a soy milk maker a little while ago, and let me tell you, it's been getting a workout! And it's certainly very worth it. Through trial an error I've come up with a soy milk recipe we both like, and I can make it for 50c for 1.5L. Awesome. (The recipe is 100g whole organic soy beans, soaked but unskinned, and 2 tbsp unsweetened dessicated coconut by the way. I got the coconut idea from Theresa at the Tropical Vegan.)

Anyway, we were getting over soymilk, well I was because I'd been eating cereal every morning because it's quick to eat before work, and I just happened to have a kilo bag of almonds and I though why not almond milk? I used to make almond milk myself with a blender and lots of patience and it was delicious (and raw) but my patience ran out so I stopped doing that. 
Ignore the cheeki bottle, I'm going to write another post about those later

For my almond milk using the machine (so much easier, funnily enough) I put 100g raw almonds in to soak for at least an hour, put them into the little filter basket, filled the jug up with 1L of water and pressed the appropriate buttons to make the machine NOT* cook it and waited. 

The end result is a lovely sweet tasting creamy almond milk. I still can't get over how these non-dairy milks are all white, by the way.

It's awesome on cereal. Works well in baking.
Makes a pretty good hot cocoa.
And an even better banana-mixed berry-chia seed-smoothie!

I haven't tried it in coffee or tea because I don't drink those beverages with milk! So you'll have to give it a go yourselves.

I can make 1L of raw almond milk, unsweetened, for $1. Cheaper almonds can be found, however, so it could cost less. Do you know how much this stuff costs in the stores? Like $10, no joke. That's why I've never had storebought before! I've got a whole list of expensive-to-buy non-dairy milks to try and make. Quinoa is one of them. Oat milk. A rice milk that tastes good (haven't been too successful yet!) Hemp? Hmm..

Oh! And it's so so so much easier to clean. All I have to do is rinse the filter basket and the blades and give the heating thing a quick wipe. All clean. With cooked soy I have to scrub the damn thing even if I do it striaght away!

*When I made this using my machine for the first time I used the same process as for soy beans, which cooks the milk...it separated and was gross. So raw it is!

Wednesday, March 16, 2011

Passionfruit Baked Cheesecake

I've just been cooking reruns lately and throwing stuff together from my stash of leftovers in the freezer, so I'm posting other stuff I just haven't got aroud to yet. Like this delicious cheesecake :)
Passionfruit Baked Cheesecake
Serves 8 - 10

Ingredients
Cheesecake
125g vegan cream cheese (I used Tofutti but another brand will work too)
300g firm silken tofu
1/2 cup raw sugar
2 tbsp rice syrup or maple syrup
2 tbsp corn flour
1 tsp vanilla extract

Passionfruit glaze
1/4 cup passionfruit  pulp (from about 6 small fruit)
1 tsp agar agar flakes, soaking in some water
1/4 cup additional water

(Plus your favourite cheesecake crust recipe - mine wasn't very good! I sort of made an oatmeal shortcrust pastry)
 Put the first 6 ingredients in a food processor and blend until very smooth.
Like so. Try not to eat it all. It is pretty good.

Pour into your prepared crust and bake in a 180 degree oven for about an hour. Mine took a little bit more. It should be firm around the outside and almost set in the middle. Set aside to cool while you make the passionfruit glaze to put on top.

Combine the passionfruit pulp, drained soaked agar agar, and 1/4 cup water in a small sauce pan. Cook on a low heat until reduced to about 1/4 cup. Pour mixture over the cheesecake (it doesn't have to be cold) and put it in the fridge at least 3 hours before slicing and eating!
I used a springform cake pan to make mine. I just find it easier to take out and slice then.

The passionfruit seeds got a little crunchy. You can just pour the pulp over the top without cooking it at all if you can't be bothered. I won't bother next time! The glaze part was mainly just an experiment.

This cheesecake is so awesome. We ate it all in about 2 days (gluttons!!).

I will refine the recipe and next time I make it I'll post it again including the crust, if I actually make a good one. Mine always seem to turn out like tough pastry! Which I like, but Nadine likes biscuit crumb bases :)

Monday, March 14, 2011

Homemade Kalamata Olive and Herb Bread

Nadine and I often buy fancy bread from the European bakery that's conviniently open across the road for weekend breakfasts, and our favourite is the kalamata olive loaf.

However, it costs $6, it's made from white flour and also has a million unescessary other ingredients in it's long (vegan, I checked, the poor guy at the counter was very flustered haha) list. Sugar, preservative numbers, this, that, the other. But damn it is a tasty bread.

But since I can't afford that sort of money for bread anymore (or their delicious traditional German pretzels homg) or ever really could, I decided one weekend to just make some.
*drool*

It turned out pretty awesome.

Kalamata Olive and Herb Bread
Makes 1 loaf

Ingredients

450g wholemeal flour
1 sachet of instant dried yeast (this is about 2.5 tsp)
1/2 tsp salt
50g gluten flour (vital wheat gluten)
2 tbsp (or more!) or mixed dried herbs or your favourite
100g chopped or sliced kalamata olives (make sure there are NO pits! it's not worth losing a tooth over)
Enough warm water to make a firm moist dough

Mix together flour, gluten flour, salt, olives, herbs, and yeast. Make a well in the center and pour in the warm water (start with one cup).

Mix the dough, adding more water until a firm elastic dough is achieved.

Turn onto a floured bench. Knead for 5 minutes or until smooth. Place in an oiled bowl and let rise* for about 1/2 an hour or until double in size.

Knead again lightly. Press out dough gently to about the length of your loaf tin and roll it up. Place the rolled up dough in the tin with the 'seam' side down. Let rise again until doubled.

Bake at 200 degrees C for 30-40 minutes or until brown and sounds hollow when tapped.

Try to let it cool down before you slice it or eat it!

*I have a gas oven at home so I light it for a few seconds then turn it off and leave the dough to rise inside. It works perfectly.
In this particular loaf I made I put in too much water, and it didn't rise as much as my regular whole grain bread. But next time I'll remember about the water! I also didn't bake it long enough, it was a little doughy in the middle. And I sliced it while hot. I got impatient. Don't get impatient, it's better when cooled down!!

But the overall result was awesome, and next time we want a fancy bread for breakfast I'll make it again!

The possibilities are endless. Maybe I'll add chilli, or caramelised onion next time.

Sunday, March 13, 2011

Cashew nut butter

I've been meaning to make my own nut butters at home for a while now. I always sort of thought you needed a fancy schmancy hardcore blender like a vitamix or something to make them, but you really don't.
First, I got 150g whole raw cashew nuts (just over 1 cup) and put them in a dry frying pan (no oil) and toasted them until they started to brown. Don't burn them!
I pulsed them a few times in my normal everyday food processor from the 70's so not to stress it out too much at once.
Blended for a minute or two and it turned into dust and started clumping slightly.
I gave it a rest every now and then, to take the pictures and not burn out the motor.
Gradually it clumped up as the oils started releasing from the nuts.
Dough? Keep blending!
Suddenly it will turn into smooth smooth buttery goodness.
I stored it in an airtight container in the fridge. I only lost 10g of nuts from it, mainly from me taste testing and whatever I couldn't scrape off. I didn't measure it in cups, but my guess is the yield would be just over half a cup.

At shops I've seen cashew nut butter cost anywhere between $6 and $10 for the same amount (150g), this little batch I blended up only cost me $3. If I didn't buy stupidly expensive nuts from the fruit shop, it would probably cost even less.

Oh, and it's absolutely delicious.
I put a blob on top of some Banana Rye Muffins I made today. I'll post the recipe another time :) There's too much in this post as it is!

Being in the fridge, it does go really solid, but I don't really care about that. Next I might try almond or brazil nut butter :)

Saturday, March 12, 2011

Date day!

Today Nadine and I had the day off together (yay!) so we decided to have a date day rather than just sit around watching telly which is what we usually end up doing.
First there was breakfast. I made buckwheat pancakes again, but we had no maple syrup so we squeezed a lemon over the top and melted a little bit of margarine on them. Delicious. I also used straight buckwheat flour, not half and half. Didn't make a difference at all, I thought they might be a little dry but nope. Perfect. I topped them with some fried sliced banana.
Nadine drinking yummy cocktail
I got to choose the restaurant, so I picked Ginga Japanese restaurant because we haven't been there for ages. We started off with a cocktail - sake, gin, ginger ale, lemon and pickled ginger slices. Mmm. The sugar in it kind of gave us a headache though, haha. That's the problem with giving things up! 
Nadine ordered the bento. Clockwise from left: PLain rice with black sesame, vege tempura (eggplant, sweet potato, carrot, zucchini and capsicum) steamed vege and tofu, inari zushi and an egg sushi, Ignore that we didn't eat it haha.
We of course has edamame on the side. Can't go to a Japanese restaurant without edamame!
I had this massive bowl of veges in broth with some bean thread noodles, rice, miso soup and pickled things. Yuuuum.
The glands in my throat have been acting up over the last few days (tmi? Ha) so I ended the lovely day with a green juice :) Silver beet, carrot, orange, ginger. Hopefully it all goes away because I can't afford any days off work!

While we were in the city we walked past a little cafe that said they had vegan sweet options on a sign outside so after lunch we went and had a delicious piece of (sugary!) cake. It was chocolate with mint icing. And we found beetroot in it. It was pretty good. I forgot to take a picture though :)

Monday, March 7, 2011

Hangover food

Drank waaaayy too much last night? Never fear, Macca's deep fried hash browns need not be an option any longer.

My absolute favourite thing to eat when I've drank too much is pasta. Nothing else quite cuts it in the carb department. Plain tomato pasta sauce with heaps of chilli powder is pretty good, but the utimate is just chilli, garlic, olive oil and basil. B-vitamins are important in recovering from a hangover, so adding a spoonful of nutritional yeast or marmite to this would have been a good idea.
Still feel disgusting by dinner and about ready to crawl under the bed and die?

Noodle soup! I use any kind of noodles I happen to feel like/have, 'chicken' stock powder (I use Massel), garlic, chilli, and a green vegetable. This time I used a brocolli, but beans are good, zucchini, spinach, whatever. Brocolli is best though. Sometimes I put tofu in but it was too hard to open the packet. Heaps of garlic is good and can top up your immune system which the alcohol would have knocked down a bit.

Tasty, easy, healthy and didn't make me want to vomit when I looked at it.

Also always remember, you can prevent a hangover by drinking water while consuming alcohol at a 1:1 ratio (ie. one glass of water for every glass of wine), I also usually try to drink a heap of water before going to bed -or- I mix up some gatorade powder in cold water and chug that. It prevents dehydration which causes the headache and dry mouth of doom. I use gatorade at work so I don't get headaches on hot days. Sometimes water isn't good enough. (I haven't researched it's vegan-ness yet, please don't judge me if it isn't. I'll get to it.)

Or the ultimate hangover-preventative-measure?

Don't drink alcohol!

Thursday, March 3, 2011

Homemade Wholemeal Orecchiette

Homemade Wholemeal Orecchiette with Brocolli
Serves 4 (small)

This is adapted from the Kitchen Garden Companion recipe by Stephanie Alexander called Orecchiette and Brocolli on page 180.
Ingredients

For the Pasta:

50g (about ½ cup) chickpea flour
200g (1 cup) wholemeal plain flour
½ tsp salt
100g (½ cup) tofu ricotta
Almost half a cup of water

For the Brocolli:

500g brocolli, cut into even sized pieces
4 cloves garlic, finely chopped
3 tsp capers
2 fresh red chillies, finely chopped
vegan margarine (I use Nuttelex Lite) optional
2 tbsp Nutritional Yeast

Method:

First, make the pasta. If you can live without it, trim the thumb nail on whichever hand you use most real short.

In a small bowl mix together the flour, chickpea flour and salt. If you want you can sift it all (I'm too lazy to do this!), but make sure you add the bran back in afterwards otherwise it isn't really wholemeal any more!

Stir in the Tofu Ricotta until it starts to clump together in lumps of dough. Add water a little bit at a time (I started with ¼ cup) until dough comes together cohesively. I ended up using almost a ½ cup. This depends on how moist your 'ricotta' is.

Turn out onto a floured bench and knead for about 5 minutes. Wrap up in cling wrap or a plastic bag and leave at room temperature for 15 minutes.

After that (I ended up leaving mine for more like half an hour because I got distracted) take dough out of the plastic wrap (keep it!) and knead again on a floured surface until very smooth and supple. Break away a small lump (about the size of an egg) and re-wrap the remaining dough in plastic (so it doesn't dry out). Roll out the dough into a long snake shape, about 1cm thick. You should do this in a bit of flour so it doesn't stick to the knife too much in the next step.
Get a sharp knife and slice little bits of dough off the snake at about 3mm intervals. This is like making tiny gnocchi! Once you've done that, pick up a bit of dough and press with your (trimmed nail) thumb into the palm of your other hand and twist slightly. Put your first orecchiette on a baking tray lined with baking paper and continue repeating until all your dough has become little pasta shapes. (I'd have taken a photo of how to do this step, but I'm home alone and no one really wants to see my hands anyway! Maybe there is something on google.)

Now, either let your fresh pasta dry out, or freeze it until you need it for the meal. Or you can cook it straight away in boiling water. It shouldn't take too long fresh – about 5 minutes. Just keep tasting until it's ready for you :) They should float when done, like gnocchi does.

Put a large pot of water on to boil for cooking the pasta.

Then in a frying pan, start to fry your finely chopped garlic and thinly sliced red chilli in a fair amount of oil on med-low heat until the garlic is softened.
If the water is not yet boiling, take garlic and chilli off the heat until it is.

Once water is boiling, add your chopped brocolli pieces to the frying pan and return to the heat. Put your orecchiette into the boiling water and give it a stir. Don't forget about it! Mushy pasta isn't really fun. Especially since you just spent a fair bit of time making it!

Cook your brocolli on a higher heat until it turns bright green and starts to soften. Add in your 3 tsp of capers and let cook until the pasta is done.

Drain pasta and serve out equally into four bowls. (We had our two bowls then some containers for lunch the next day). Stir through the brocolli 2 tbsp of nutritional yeast and stir until it dissolves/goes soft. Divide evenly between bowls, top with a little blob of vegan margarine (if you want) and stir through pasta.
These seem to be really small serves so we had a bit of garlic toast with it. A salad would be better as the pasta is actually pretty filling!

I believe the tofu 'ricotta' really made a difference to the pasta. It resulted in a chewy texture and the herbs in it added a little bit of flavour. I was worried I'd put too much chickpea flour in because that's all I could smell when I was kneading it but it was perfect :) I'll definitely be making pasta like this again. The process didn't actually take that long, once I got the hang of twisting the little shapes. It probably took me an hour to make them all, not including kneading and sitting time. :)

Tuesday, March 1, 2011

101st post!


DO NOT LEAVE MARMITE TOAST UNATTENDED